Chapter 3 of Solana: A Technical Guide to Solana’s Account Model and On-Chain Data

TL;DR
- Solana’s account-centric model enables parallel execution, precise state isolation, and high-throughput performance.
- Real on-chain analysis requires understanding how accounts, instructions, and logs work together to reflect user intent and asset movement.
- Low-level decoding (signatures, logs, balances, and discriminators) reveals the mechanics behind each transaction.
- Tools like Anchor streamline program development, while indexed datasets make raw Solana data actionable.
- Nodit provides production-grade Solana infrastructure — covering nodes, indexing, analytics, and real-time intelligence
This article was prepared by Core Dev Team and edited by Marketing team of Nodit
📚Further reading:


Solana’s performance advantages are well known, but the real power of the network becomes apparent only when you understand how its architecture shapes the structure of on-chain data. This final chapter of the series focuses on why Solana uses its unique account-centric model and how that model becomes essential when analyzing real blockchain activity.
We will follow a clear path:
- Start with Solana’s account-centric execution model
- Explore how this architecture appears in real data
- Break down blocks, transactions, logs, and instructions
- Decode raw instruction bytes using IDLs and discriminators
- Transition from low-level understanding to structured program development with Anchor
- Conclude with how analyzed data is stored, indexed, and used in real-world systems
By the end, you’ll be able to trace asset movement step-by-step and understand how Solana data becomes actionable at scale.
Why is Solana all about the Account-centric model?
Solana’s high throughput is rooted in a fundamentally different architectural choice:
"Execution is scoped to accounts, not to a single global state machine."
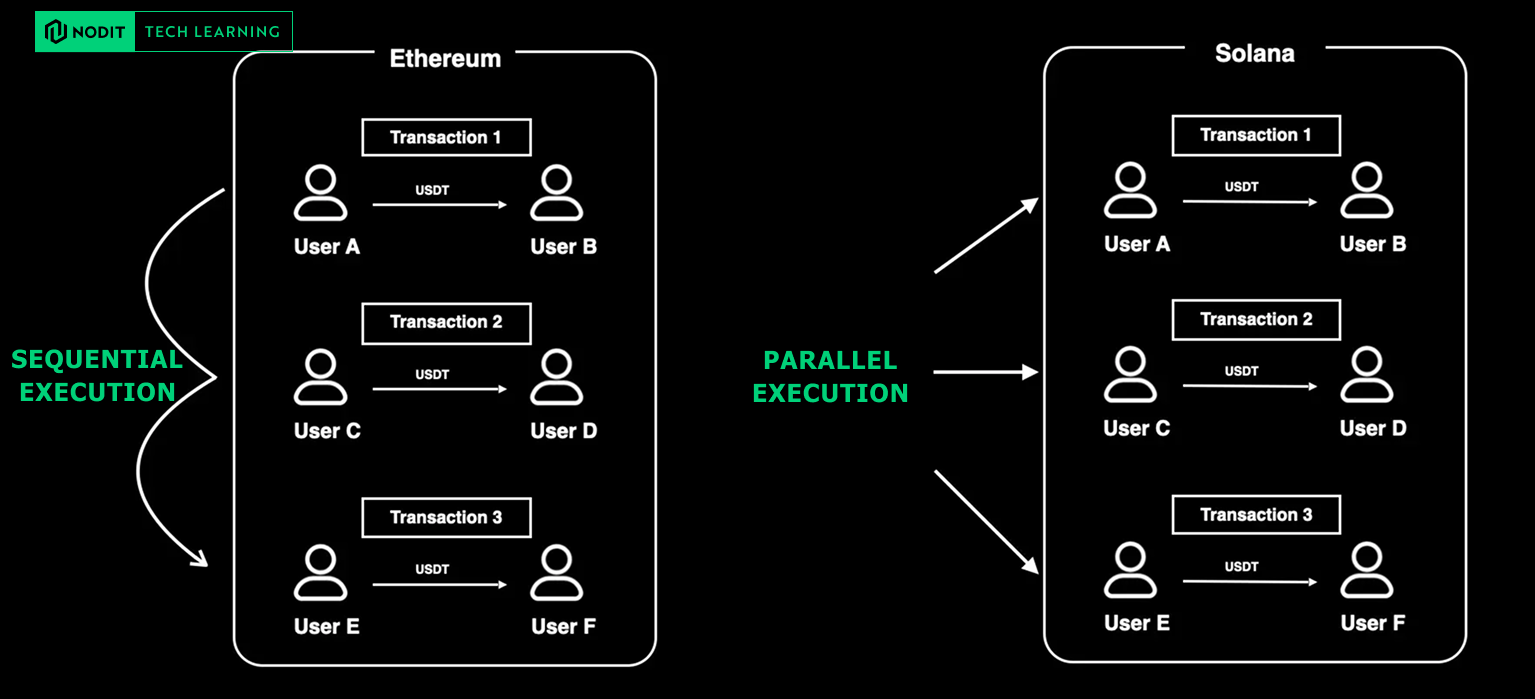
On Ethereum, even two completely unrelated USDT transfers must run one after another. This is because the EVM maintains a single shared global state and every transaction mutates that state. Serialization is mandatory.
Solana breaks from that model.
Instead of relying on a global state machine, Solana requires each transaction to declare upfront the exact accounts it intends to read from or write to. This allows the runtime to schedule all non-conflicting transactions in parallel, unlocking higher performance and scalable throughput.
Understanding this difference is the foundation for understanding Solana data — because the structure of that data directly reflects this execution model.
Comparison of Ethereum’s Global State vs. Solana’s Account Model
From Architecture to Data: A Developer’s First Step Into Solana Data
Now that we understand why Solana structures its state around accounts, the next question is:
How does this architecture appear inside real on-chain data?
To answer that, we’ll start with the most direct approach: pulling a block from the network and examining its structure.
This gives us the raw building blocks that all higher-level analytics are based on.
How to query Blocks with the Solana RPC
getBlock
DEVNET_RPC=https://api.devnet.solana.com
SLOT=398174070
ENCODE_TYPE=json #jsonParsed
curl -s -X POST -H "Content-Type: application/json" \
    -d "{
        \"jsonrpc\": \"2.0\",
        \"id\": 1,
        \"method\": \"getBlock\",
        \"params\": [
            $SLOT,
            {
                \"encoding\": \"$ENCODE_TYPE\",
                \"transactionDetails\": \"full\",
                \"maxSupportedTransactionVersion\": 0,
                \"rewards\": true
            }
        ]
    }" \
    "$DEVNET_RPC" | jq '.' > block.json
Copy and run this command in your terminal to view the raw block data from Solana.
(If jq isn’t installed, simply remove | jq '.'and run the command.)
💡Block vs Slot: What’s the Difference?
A slot is Solana’s unit of time — a discrete opportunity for a validator to produce a block.
A block is the actual set of transactions recorded in that slot.
For analytics, this distinction matters because:
- blocks themselves rarely contain meaningful insights
- the real information lives inside the transactions within the block
So let’s dive into a transaction.
Block
{
  "blockHeight": 398174070,
  "blockTime": 1758793965,
  "blockhash": "KhzTiXWa5XxYhsQaHZiSHxHh4nsA3NugrztWL7L4zhE",
  "parentSlot": 410227294,
  "previousBlockhash": "FmPAzQBf4ur1pv2SfaNNChiU2Gk4tbTspfScb8FHduCS",
  "rewards": [
    {
      "commission": null,
      "lamports": 87084,
      "postBalance": 1013297811232738,
      "pubkey": "dv2eQHeP4RFrJZ6UeiZWoc3XTtmtZCUKxxCApCDcRNV",
      "rewardType": "Fee"
    }
  ],
  "transactions": [
	  ... transaction ...
  ]
}
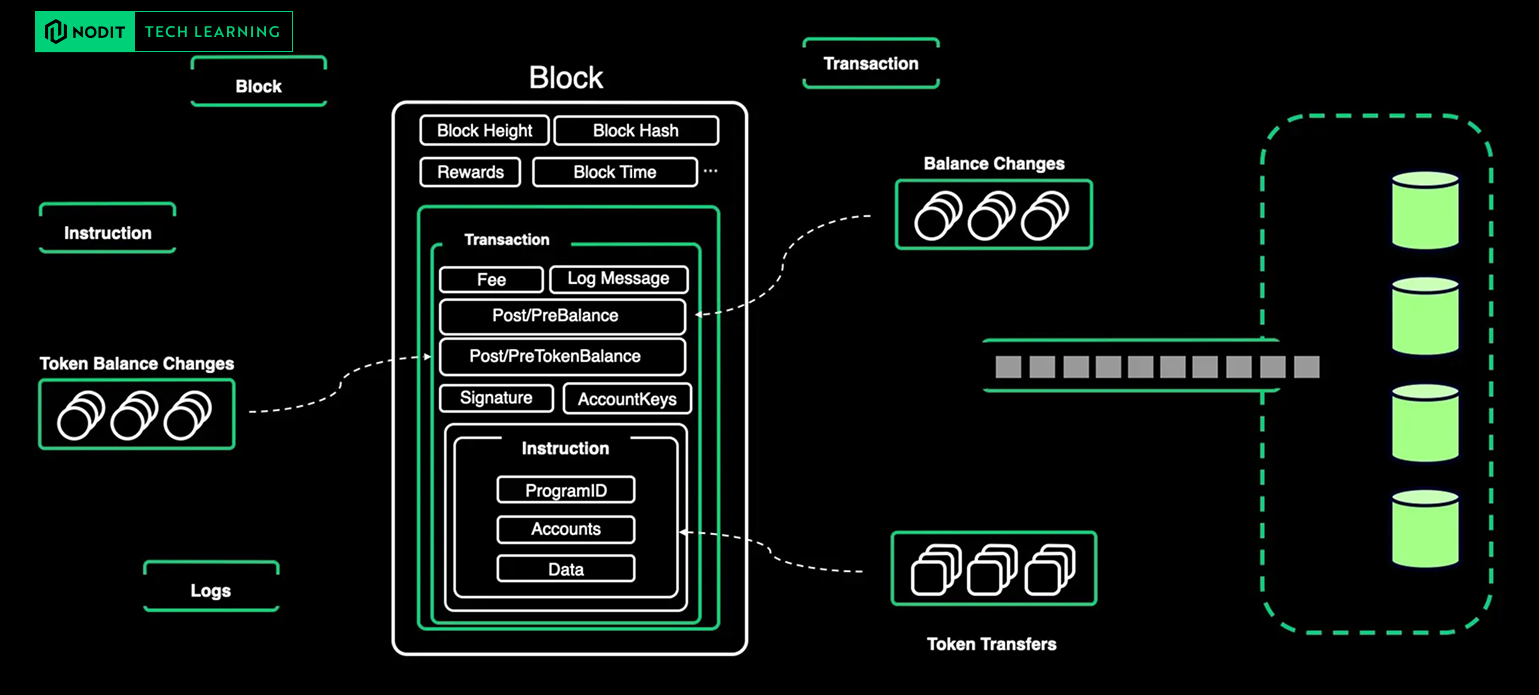
Transaction Deep Dive
A Solana transaction contains many fields, but if your goal is to understand what actually happened, three components matter most: the signature, the logs, and the instructions.
These reveal who authorized the action, which programs executed, and what operations were performed.
{
  "blockTime": 1745196488,
  "meta": {
    "computeUnitsConsumed": 150,
    "err": null,
    "fee": 5000,
    "innerInstructions": [],
    "loadedAddresses": {
      "readonly": [],
      "writable": []
    },
    "logMessages": [
      "Program 11111111111111111111111111111111 invoke [1]",
      "Program 11111111111111111111111111111111 success"
    ],
    "postBalances": [989995000, 10000000, 1],
    "postTokenBalances": [],
    "preBalances": [1000000000, 0, 1],
    "preTokenBalances": [],
    "rewards": [],
    "status": {
      "Ok": null
    }
  },
  "slot": 13049,
  "transaction": {
    "message": {
      "header": {
        "numReadonlySignedAccounts": 0,
        "numReadonlyUnsignedAccounts": 1,
        "numRequiredSignatures": 1
      },
      "accountKeys": [
        "8PLdpLxkuv9Nt8w3XcGXvNa663LXDjSrSNon4EK7QSjQ",
        "7GLg7bqgLBv1HVWXKgWAm6YoPf1LoWnyWGABbgk487Ma",
        "11111111111111111111111111111111"
      ],
      "recentBlockhash": "7ZCxc2SDhzV2bYgEQqdxTpweYJkpwshVSDtXuY7uPtjf",
      "instructions": [
        {
          "accounts": [0, 1],
          "data": "3Bxs4NN8M2Yn4TLb",
          "programIdIndex": 2,
          "stackHeight": null
        }
      ],
      "indexToProgramIds": {}
    },
    "signatures": [
      "3jUKrQp1UGq5ih6FTDUUt2kkqUfoG2o4kY5T1DoVHK2tXXDLdxJSXzuJGY4JPoRivgbi45U2bc7LZfMa6C4R3szX"
    ]
  },
  "version": "legacy"
}
1️⃣ Signature
A transaction’s message is serialized and then signed with Ed25519.
The first signature is treated as the “authoritative” signature — the one required for the transaction to be valid.
 "signatures": [
      "3jUKrQp1UGq5ih6FTDUUt2kkqUfoG2o4kY5T1DoVHK2tXXDLdxJSXzuJGY4JPoRivgbi45U2bc7LZfMa6C4R3szX"
	]
2️⃣ Log Messages
Log Messages represent the collection of all logs generated during the execution of a program.
Logs that follow the standard format
- invoke
Program {PROGRAM_ID} invoke [{DEPTH}]
- success, failed
Program {PROGRAM_ID} success
Program {PROGRAM_ID} failed: {ERROR_REASON}
Example
Instruction 1:
├── Program A invoke [1]
│   ├── Program B invoke [2]
│   │   ├── Program C invoke [3]
│   │   └── Program C success
│   ├── Program B success
│   ├── Program D invoke [2]
│   └── Program D success
└── Program A success

Instruction 2:
├── Program E invoke [1]
└── Program E success
Custom Logs
Non-standard custom logs — especially those used in DeFi or other systems with complex asset flows — often contain information that cannot be fully understood from instruction calls alone. In these cases, log messages are essential for tracing state changes or interpreting program behavior.
To decode these logs, the program’s IDL (Interface Description Language) is required. The IDL defines how each event is formatted and how the logged data should be interpreted, similar to how an ABI works in the EVM.
Program data: <base64_encoded_event_data> // <- raw event data
Example of pumpfun IDL Event
"events": [
    {
      "name": "TradeEvent",
      "fields": [
        { "name": "mint", "type": "publicKey", "index": false },
        { "name": "solAmount", "type": "u64", "index": false },
        { "name": "tokenAmount", "type": "u64", "index": false },
        { "name": "isBuy", "type": "bool", "index": false },
        { "name": "user", "type": "publicKey", "index": false },
        { "name": "timestamp", "type": "i64", "index": false },
        { "name": "virtualSolReserves", "type": "u64", "index": false },
        { "name": "virtualTokenReserves", "type": "u64", "index": false },
        {
          "name": "realSolReserves",
          "type": "u64",
          "index": false
        },
      ...
    }
]
Logs show us the execution path, but they don’t reveal the final effects. To understand how assets actually moved, we look at the balance snapshots before and after the transaction.
Balance Changes: PreBalance and PostBalance
Logs show execution flow. Balance snapshots show the result.
preBalances and postBalances represent the balance changes for each account before and after a transaction is executed. These values reflect updates to both SOL balances and any token balances involved in the transaction.
These snapshots allow analysts to reconstruct:exact SOL movementexact token movementwhich accounts were affectedwhere assets originated and where they ended up
This becomes essential when tracing DeFi activity or token flows.
"transaction": {
	"meta": {
    "postBalances": [
	    93478565,
	    1021560,
	    19069463101576,
	    12196876513,
	    2039280,
	  ],
		"preBalances": [
	    93857334,
	    956560,
	    19069462882348,
	    12196876512,
	    2039280,
	  ],
	  ...
  },
  "message": {
    "accountKeys": [
      "CGSzxfZVJ4qFsExV5NYEU8NWSMDb7QbfHMuMH9UcmVu6",
      "3AVi9Tg9Uo68tJfuvoKvqKNWKkC5wPdSSdeBnizKZ6jT",
      "FWsW1xNtWscwNmKv6wVsU1iTzRN6wmmk3MjxRP5tT7hz",
      "Bu2HfsdMwUSZhQkz53ixcnM5B6kYM42ZHCZbX1QKKzdX",
      "Aaw7b8w6DUU25ev5qxSqNfSUumhCeKMRod9cKAL5gVB7",
    ],
}
Example ofpreTokenBalancesandpostTokenBalancesin a transaction that involves a token transfer
"transaction": {
	"meta": {
    "postTokenBalances": [
		  {
		    "accountIndex": 4,
		    "mint": "88BnAnuLJzcmz1yYwT9Wm1tVjcDeUWXRj5gZXQapump",
		    "owner": "Bu2HfsdMwUSZhQkz53ixcnM5B6kYM42ZHCZbX1QKKzdX",
		    "programId": "TokenkegQfeZyiNwAJbNbGKPFXCWuBvf9Ss623VQ5DA",
		    "uiTokenAmount": {
		      "amount": "689887660263305",
		      "decimals": 6,
		      "uiAmount": 689887660.263305,
		      "uiAmountString": "689887660.263305"
		    }
		  },
		  {
		    "accountIndex": 5,
		    "mint": "88BnAnuLJzcmz1yYwT9Wm1tVjcDeUWXRj5gZXQapump",
		    "owner": "CGSzxfZVJ4qFsExV5NYEU8NWSMDb7QbfHMuMH9UcmVu6",
		    "programId": "TokenkegQfeZyiNwAJbNbGKPFXCWuBvf9Ss623VQ5DA",
		    "uiTokenAmount": {
		      "amount": "0",
		      "decimals": 6,
		      "uiAmount": null,
		      "uiAmountString": "0"
		    }
		  }
		],
		"preTokenBalances": [
		  {
		    "accountIndex": 4,
		    "mint": "88BnAnuLJzcmz1yYwT9Wm1tVjcDeUWXRj5gZXQapump",
		    "owner": "Bu2HfsdMwUSZhQkz53ixcnM5B6kYM42ZHCZbX1QKKzdX",
		    "programId": "TokenkegQfeZyiNwAJbNbGKPFXCWuBvf9Ss623VQ5DA",
		    "uiTokenAmount": {
		      "amount": "689887660263305",
		      "decimals": 6,
		      "uiAmount": 689887660.263305,
		      "uiAmountString": "689887660.263305"
		    }
		  },
		  {
		    "accountIndex": 5,
		    "mint": "88BnAnuLJzcmz1yYwT9Wm1tVjcDeUWXRj5gZXQapump",
		    "owner": "CGSzxfZVJ4qFsExV5NYEU8NWSMDb7QbfHMuMH9UcmVu6",
		    "programId": "TokenkegQfeZyiNwAJbNbGKPFXCWuBvf9Ss623VQ5DA",
		    "uiTokenAmount": {
		      "amount": "0",
		      "decimals": 6,
		      "uiAmount": null,
		      "uiAmountString": "0"
		    }
		  }
		],
		...
  },
  "message": {
    "accountKeys": [
      "CGSzxfZVJ4qFsExV5NYEU8NWSMDb7QbfHMuMH9UcmVu6",
      "3AVi9Tg9Uo68tJfuvoKvqKNWKkC5wPdSSdeBnizKZ6jT",
      "FWsW1xNtWscwNmKv6wVsU1iTzRN6wmmk3MjxRP5tT7hz",
      "Bu2HfsdMwUSZhQkz53ixcnM5B6kYM42ZHCZbX1QKKzdX",
      "Aaw7b8w6DUU25ev5qxSqNfSUumhCeKMRod9cKAL5gVB7",
    ],
}
All token accounts associated with the transaction are tracked — even if their balances remain unchanged.
As these accounts are included in the transaction’s accountKeys, the runtime captures their state both before and after execution. This ensures a complete snapshot of how all related accounts were affected, making it easier to analyze token movements and interactions.
- Mint Account:
88BnAnuLJzcmz1yYwT9Wm1tVjcDeUWXRj5gZXQapump - Token Account:
Aaw7b8w6DUU25ev5qxSqNfSUumhCeKMRod9cKAL5gVB7 - Owner:
Bu2HfsdMwUSZhQkz53ixcnM5B6kYM42ZHCZbX1QKKzdX
3️⃣ Instructions - The Key to Understanding Asset Movement
With balance snapshots established, the next logical step is to break down why those balances changed. On Solana, all asset movement is the result of specific program instructions. By analyzing these instructions, we can reconstruct the complete flow of SOL and token transfers within a transaction.
When compared to Ethereum’s model, Solana’s instruction structure maps closely to familiar concepts:
- Solana
program≈ Ethereum contract - Solana
instruction≈ Ethereum contract function call
Example of the Instruction
"transaction": {
    "message": {
      "accountKeys": [
        "8PLdpLxkuv9Nt8w3XcGXvNa663LXDjSrSNon4EK7QSjQ",
        "7GLg7bqgLBv1HVWXKgWAm6YoPf1LoWnyWGABbgk487Ma",
        "11111111111111111111111111111111"
      ],
      "instructions": [
        {
          "accounts": [0, 1],
          "data": "3Bxs4NN8M2Yn4TLb",
          "programIdIndex": 2,
          "stackHeight": null
        }
      ],
      ...
} .
- account: index of the account within the
accountKeysarray - data: the instruction payload, encoded in Base64
- programIdIndex: index of the program being invoked
- stackHeight: the call depth at which the instruction was executed
Why Should I Care? Understanding the Instruction Discriminator
To decode an instruction, the first step is identifying which function within the program was invoked. The instruction discriminator serves exactly this purpose—similar to the EVM function selector, it tells the program which handler to execute.

Without decoding the discriminator, you cannot know:
- which instruction handler is being called
- how to parse the rest of the payload
- what the instruction is trying to do
Breaking Down an Instruction
To analyze an instruction, the first step is determining which program it belongs to. Once the program is identified, you can decode the data field according to that program’s instruction layout (IDL).
accounts[0] → 8PLdpLxkuv9Nt8w3XcGXvNa663LXDjSrSNon4EK7QSjQ (from account)
accounts[1] → 7GLg7bqgLBv1HVWXKgWAm6YoPf1LoWnyWGABbgk487Ma (to account)
programId → 11111111111111111111111111111111 (System Program)
After identifying the program and mapping the account indexes, the next step is to analyze the data field using the program’s IDL (Interface Description Language). The IDL defines how the instruction payload is structured, allowing us to decode the discriminator and the parameters encoded in the transaction.
# Partial System Program IDL
{
  "name": "Transfer",
  "docs": ["Transfer lamports"],
  "accounts": [
    {
      "name": "FundingAccount",
      "isMut": true,
      "isSigner": true,
      "docs": ["Funding account"]
    },
    {
      "name": "RecipientAccount",
      "isMut": true,
      "isSigner": false,
      "docs": ["Recipient account"]
    }
  ],
  "args": [
    {
      "name": "lamports",
      "type": "u64",
      "docs": ["Number of lamports to transfer to the new account"]
    }
  ]
}
The instruction’s data field, 3Bxs4NN8M2Yn4TLb , is encoded in Base58. So the first step is to decode it.
Base58-decoded bytes from "3Bxs4NN8M2Yn4TLb"
-> 02 00 00 00 80 96 98 00 00 00 00 00
The first 4 bytes (02 00 00 00) represent the Transfer instruction discriminator for the System Program (0x02).
The remaining 8 bytes (80 96 98 00 00 00 00 00) correspond to the amount being transferred, encoded in little-endian.
This value equals 10,000,000 lamports, which is 0.01 SOL.
From this decoded payload, we can extract the full transfer information:
- Instruction Type: Transfer (2)
- From:
8PLdpLxkuv9Nt8w3XcGXvNa663LXDjSrSNon4EK7QSjQ - To:
7GLg7bqgLBv1HVWXKgWAm6YoPf1LoWnyWGABbgk487Ma - Amount: 10,000,000 lamports (0.01 SOL)
Core Instruction Discriminator
System Program:
0 = CreateAccount
1 = Assign
2 = Transfer
3 = CreateAccountWithSeed
...
SPL Token Program:
0 = InitializeMint
1 = InitializeAccount
3 = Transfer
4 = Approve
...
System Instruction Analysis
Initialize Instructions
"Initialize" variants are used when an account is being set up for the first time.
These instructions run right after an account is created and are responsible for establishing its initial configuration and state.
# Example of **InitializeMint** (Instruction Discriminator: 0)
{
  "data": "AAI..."// 0 + decimals + mint_authority + freeze_authority
}
- Configure a newly created account as a Token Mint
- Define the mint’s decimal precision
- Assign mint authority
- Assign freeze authority
Transfer & TransferChecked
TransferChecked is essentially a safer variant of Transfer, adding extra validation steps that protect against incorrect decimals or malformed token operations.
// Basic transfer — only the amount is provided
// Instruction Discriminator: 3
Transfer {
    source,        // account sending tokens
    destination,   // account receiving tokens
    authority,     // signer that authorizes the transfer
}

// Enhanced transfer with additional checks
// Instruction Discriminator: 12
TransferChecked {
    source,        // account sending tokens
    mint,          // ← extra: verifies the mint account
    destination,   // account receiving tokens
    authority,     // signer that authorizes the transfer
    signers,       // ← extra: supports multisig
    // amount + decimals are passed as parameters
}
As TransferChecked requires the decimal value of the mint, it prevents exploits where attackers manipulate decimal expectations (e.g., fractional-amount phishing issues).
In practice:
Transferis typically used when the system knows the context is safe or when minimizing compute cost is important.TransferCheckedis preferred for user-facing DApps, high-value transfers, or protocols where correctness and security matter more than compute savings.
Burn vs BurnChecked
The difference between Burn and BurnChecked follows the same logic as the transfer instructions:
the “checked” version includes extra validation to ensure the amount is interpreted correct.
// Risky Burn
Burn({
    amount: 1000000,// unclear what this represents without knowing decimals
});

// Safer BurnChecked
BurnChecked({
    amount: 1000000,// 1,000,000 units
    decimals: 6,// = represents exactly 1.0 USDC
    mint: "USDC_MINT_ADDRESS"
});
Using BurnChecked prevents issues where the amount could be misinterpreted due to incorrect decimals, which can lead to accidental over-burns or targeted phishing-style exploits.
MintTo vs MintToChecked
MintTo and MintToChecked follow the same pattern.
The checked version ensures the mint and decimal precision are correct before minting tokens.
// MintTo (General)
MintTo({
    amount: 5000000,
});

// MintToChecked (Validated)
MintToChecked({
    amount: 5000000,// 5,000,000 units
    decimals: 6,// = represents exactly 5.0 tokens
    mint: "TOKEN_MINT_ADDRESS"
});
MintToChecked adds a layer of protection by ensuring the expected mint and decimal configuration match, reducing the risk of minting an unintended amount.
From Low-Level Decoding to Building Programs with Anchor
At this point, we’ve explored how Solana instructions are structured, how discriminators identify instruction types, how logs reveal execution flow, and how balance snapshots show the final state changes. This low-level understanding is essential for debugging, tracing asset movement, and interpreting on-chain activity.
However, building real-world Solana programs directly at this low level is cumbersome. Handling account validation, serialization, constraints, and discriminator management manually is both error-prone and time-consuming.
This is where Anchor becomes the preferred framework for most development teams. Anchor provides:
- a structured programming model
- automatic account validation
- consistent instruction and account discriminators
- generated IDLs that clients and analytics tools rely on
By offering conventions and tooling that sit on top of the raw system, Anchor significantly streamlines the development workflow while remaining fully compatible with Solana’s core architecture.
Installing Anchor: https://www.anchor-lang.com/docs/installation
Anchor Program Code
use anchor_lang::prelude::*;

declare_id!("kxHhVfJJCSwLpGQGYCznsWfkcEyiiU31WJzbi3F3g4D");

#[program]
mod basic_1 {
    use super::*;

    pub fn initialize(ctx: Context<Initialize>, data: u64) -> Result<()> {
        let my_account = &mut ctx.accounts.my_account;
        my_account.data = data;
        Ok(())
    }

    pub fn update(ctx: Context<Update>, data: u64) -> Result<()> {
        let my_account = &mut ctx.accounts.my_account;
        my_account.data = data;
        Ok(())
    }
}

#[derive(Accounts)]
pub struct Initialize<'info> {
    #[account(init, payer = user, space = 8 + 8)]
    pub my_account: Account<'info, MyAccount>,
    #[account(mut)]
    pub user: Signer<'info>,
    pub system_program: Program<'info, System>,
}

#[derive(Accounts)]
pub struct Update<'info> {
    #[account(mut)]
    pub my_account: Account<'info, MyAccount>,
}

#[account]
pub struct MyAccount {
    pub data: u64,
}
#[derive(Accounts)]- An Anchor macro that defines the accounts an instruction needs.
- It automatically handles loading, validation, and constraint checks for you.
- This removes a lot of boilerplate and keeps account-related logic clean and readable.
#[account(init, payer = user, space = 8 + 8)]initTells Anchor to create this account when the instruction runs.Behind the scenes, it calls the System Program’screate_account.payer = userSpecifies who pays the rent/creation cost for the new account.Here, theusersigner covers that fee.space = 8 + 8Sets how much storage space to allocate for the account.- 8 bytes for Anchor’s built-in account discriminator
- 8 bytes for the actual data you want to store (e.g., a
u64)
IDL:
{
  "address": "kxHhVfJJCSwLpGQGYCznsWfkcEyiiU31WJzbi3F3g4D",
  "metadata": {
    "name": "basic_1",
    "version": "0.1.0",
    "spec": "0.1.0",
    "description": "Created with Anchor"
  },
  "instructions": [
    {
      "name": "initialize",
      "discriminator": [
        175,
        175,
        109,
        31,
        13,
        152,
        155,
        237
      ],
      "accounts": [
        {
          "name": "my_account",
          "writable": true,
          "signer": true
        },
        {
          "name": "user",
          "writable": true,
          "signer": true
        },
        {
          "name": "system_program",
          "address": "11111111111111111111111111111111"
        }
      ],
      "args": [
        {
          "name": "data",
          "type": "u64"
        }
      ]
    },
    {
      "name": "update",
      "discriminator": [
        219,
        200,
        88,
        176,
        158,
        63,
        253,
        127
      ],
      "accounts": [
        {
          "name": "my_account",
          "writable": true
        }
      ],
      "args": [
        {
          "name": "data",
          "type": "u64"
        }
      ]
    }
  ],
  "accounts": [
    {
      "name": "MyAccount",
      "discriminator": [
        246,
        28,
        6,
        87,
        251,
        45,
        50,
        42
      ]
    }
  ],
  "types": [
    {
      "name": "MyAccount",
      "type": {
        "kind": "struct",
        "fields": [
          {
            "name": "data",
            "type": "u64"
          }
        ]
      }
    }
  ]
}
How Do We Store the Data We’ve Analyzed — and When Is It Used?
Core Data Types on Solana
RPC is excellent for asking “what is the current state?”, but extremely inefficient for asking historical questions like “show me every USDT transfer for this account.” Indexed datasets and data warehouses are what bridge this gap.
Solana exposes data at several layers — blocks, transactions, instructions, logs, account states, and more.
Some datasets (such as raw blocks or instruction logs) are already informative in their original form, while others (like transfers, token movements, and balance deltas) must be derived by decoding, correlating, and reconstructing runtime events.
Once processed, these enriched datasets are typically persisted in database or data-warehouse systems such as PostgreSQL, MongoDB, or Elasticsearch.
This enables:
- Deterministic queries over large volumes of historical data
- Efficient indexing for entity-level lookups
- Data modeling for analytics or monitoring
- Downstream pipelines for dashboards, alerts, and intelligence systems
This is where Nodit’s infrastructure layer becomes useful:
- Nodit Web API — Provides pre-indexed, structured blockchain data (blocks, transactions, token transfers, logs, balances, and more) without having to operate your own RPC nodes, pipelines, or indexers.
- Datasquare — A data exploration layer that sits on top of indexed Solana datasets, offering SQL-like queries, dashboards, and schema-driven analytics.
- Clair — A real-time intelligence engine built on top of Nodit’s data warehouse, enabling automated insights, anomaly detection, and data-driven tracing of on-chain activity.
These systems eliminate the need to manually build ETL pipelines or maintain stateful indexers, allowing developers to work directly with clean, structured, and query-ready on-chain data.
Indexing Data: Using the Web3 Data API Effectively
Q. How can I fetch all USDT transfer activity for a specific account?
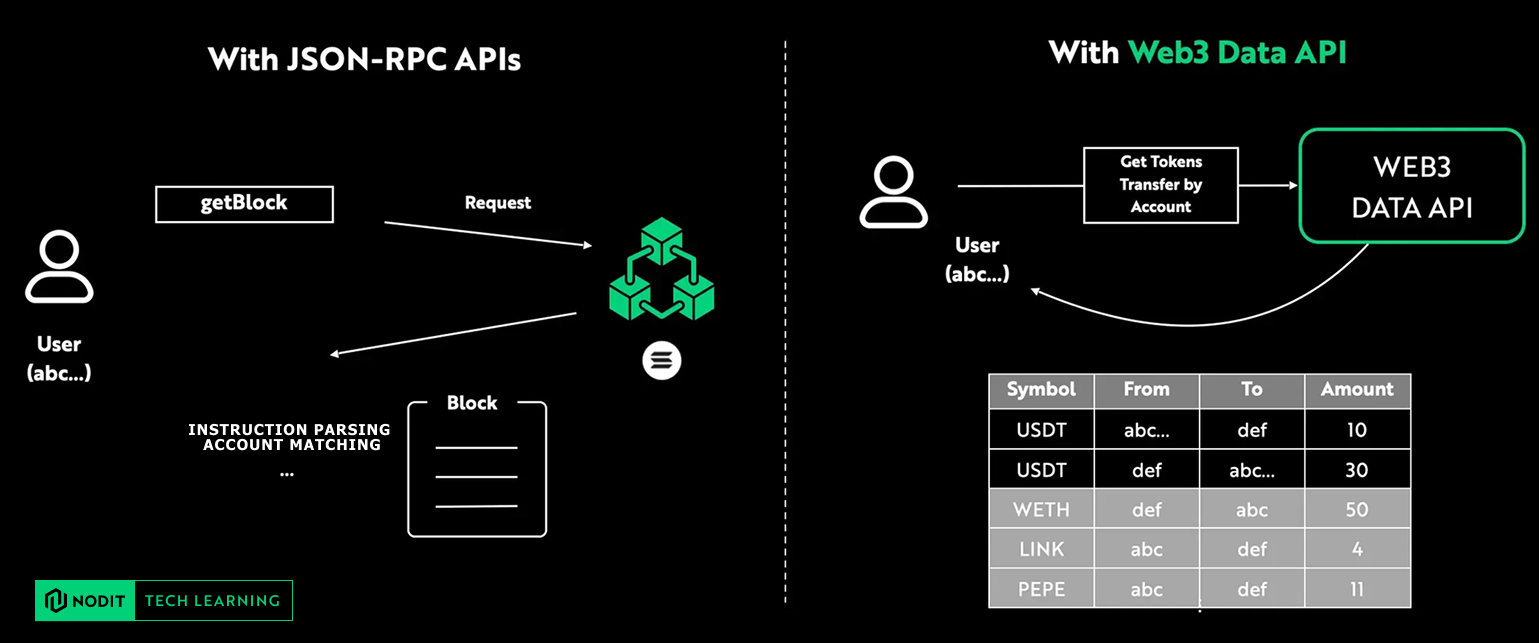
If you rely only on RPC, you would need to manually fetch blocks, iterate through every transaction, decode each instruction, extract token movement events, and then reconstruct the actual transfer history. Not only is this slow and compute-heavy — it also gives you fragmented, incomplete insights unless you build your own indexing pipeline on top.
In contrast, with the Web3 Data API, transfer events are already pre-indexed and stored in a structured database. This means you can query token transfers directly and reliably, without having to process raw blocks or maintain your own indexer.
The result: fast, accurate, production-ready on-chain data with a single API request.
Estimating Solana’s Data Scale
How much data does Solana generate in a single day?
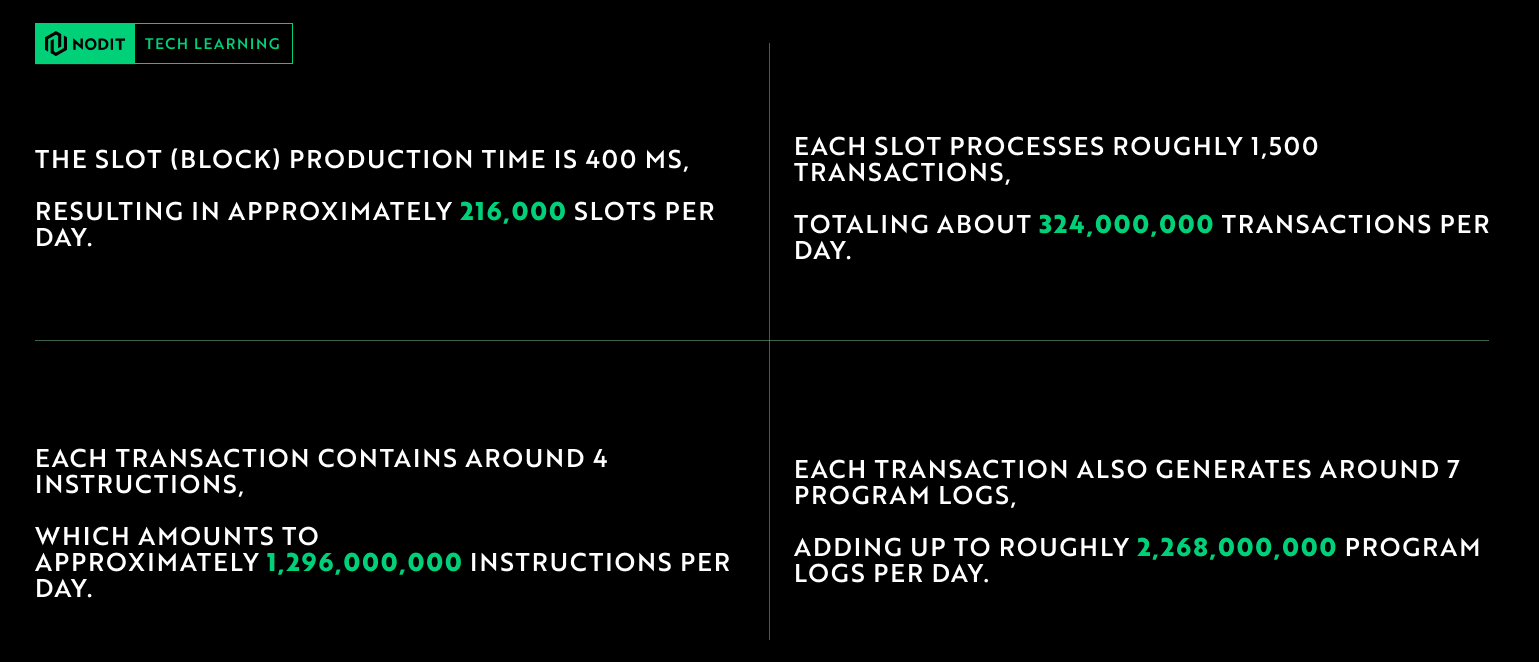
Solana has already produced over 410 million blocks, and the network continues to grow at a rate of roughly 2.5 blocks per second.
This scale is the foundation of Solana’s high-throughput design — but it also means the volume of data generated each day is enormous.
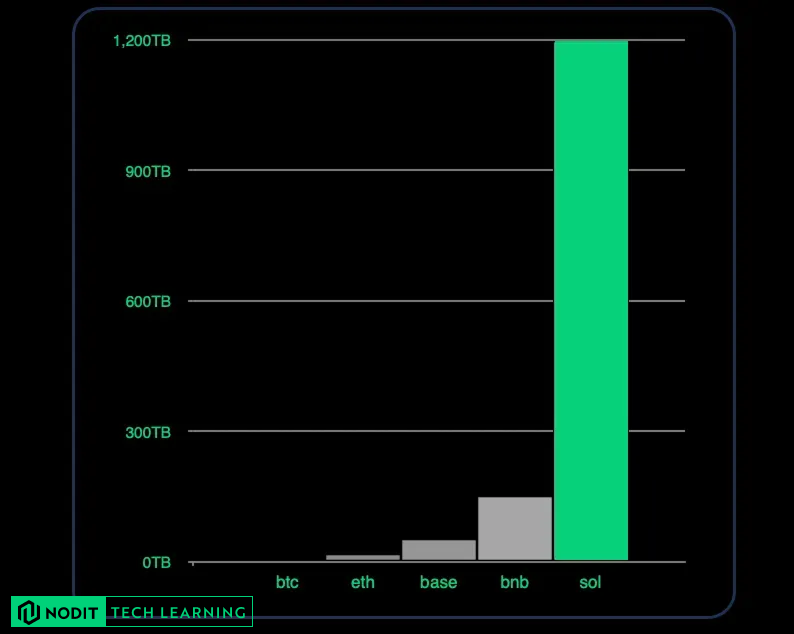
How does this compare to other networks?
A Data-First Perspective Ahead of Breakpoint
This overview has outlined Solana’s foundational account model, its high-performance execution architecture, and the structure of real on-chain data—providing a clear baseline for teams evaluating Solana, building new products.
As Breakpoint approaches, our Node Operation Team Lead will be on-site to discuss Solana operations, high-throughput infrastructure, and large-scale data indexing. If you’d like to dive deeper into Solana data or explore how Nodit supports production workloads, feel free to book us a coffee chat. ☕

🔎About Nodit
Nodit is a platform that provides reliable node and consistent data infrastructure to support the scaling of decentralized applications in a multi chain environment. The core technology of Nodit is a robust data pipeline that performs the crawling, indexing, storing, and processing of blockchain data, along with a dependable node operation service. Through its new Validator as a Service (VaaS) offering, Nodit delivers secure, transparent, and compliant validator operations that ensure stability, performance visibility, and regulatory assurance.
By utilizing processed blockchain data, developers and enterprises can achieve seamless on chain and off chain integration, advanced analytics, comprehensive visualization, and artificial intelligence modeling to build outstanding Web3 products.
Homepage l X (Twitter) l Linkedin
Join us and build more👊🏻
👉Start for Free (Click)